
If you want to clean up your audio, be it a live recording or a podcast, you need a tool that can help you remove unwanted sounds and frequencies. The most common solution to reduce low end noise is to use a high-pass filter.
Adding a high-pass filter to your mix will not only remove unwanted sounds that make your recordings muddy, but will also naturally enhance the qualities of the lead instruments and vocals.
While this effect can indeed improve the quality of your audio, when used incorrectly it can reduce the depth and spontaneity of your song, making it sound more artificial. In this article, we’ll look into the best ways of using this crucial effect to improve the quality of your recordings.
What is a High-Pass Filter?
A high-pass filter is an equalization tool that removes all frequencies below a set point. In other words, a high pass filter leaves high frequencies untouched while mitigating low frequencies.
There are two main types of audio filters: high pass and low pass. It’s easy to get confused, but remember this: a high pass filter doesn’t affect high frequencies, and a low-pass filter doesn’t affect low frequencies.

When to Use a High-Pass Filter
Remove low frequencies
Every instrument operates within a specific band of frequencies, and by using a high-pass filter, you can remove or reduce the frequencies on the lower side of the spectrum. For example, a standard male voice’s frequency gravitates around 80 Hertz; so if you’re working on a podcast, you can use a high pass filter to remove the frequencies below 80 Hertz.
Remove Environmental Noise
Traffic, wind noise, air conditioning, and fans all add noise and disturbance to our audio signal. Often (but not always), you can use a high-pass filter to remove most of the background noise from your audio.
Remove Plosives, or "P-pops"
Plosives are the kinds of sounds where air flow in the lungs is briefly blocked from flowing out through the mouth and nose, causing pressure to build up behind the blockage. To hear what we mean, try sounding out the letters p, t, k, b, d, and g.
Sometimes referred to as “P-pops”, plosives have always been a big problem for singers and podcasters. It's always best to avoid them during the recording session by placing a pop filter between the microphone and your mouth. However, when you find plosive sounds in your recordings, you can use a high-pass filter to reduce their impact on the audio track.

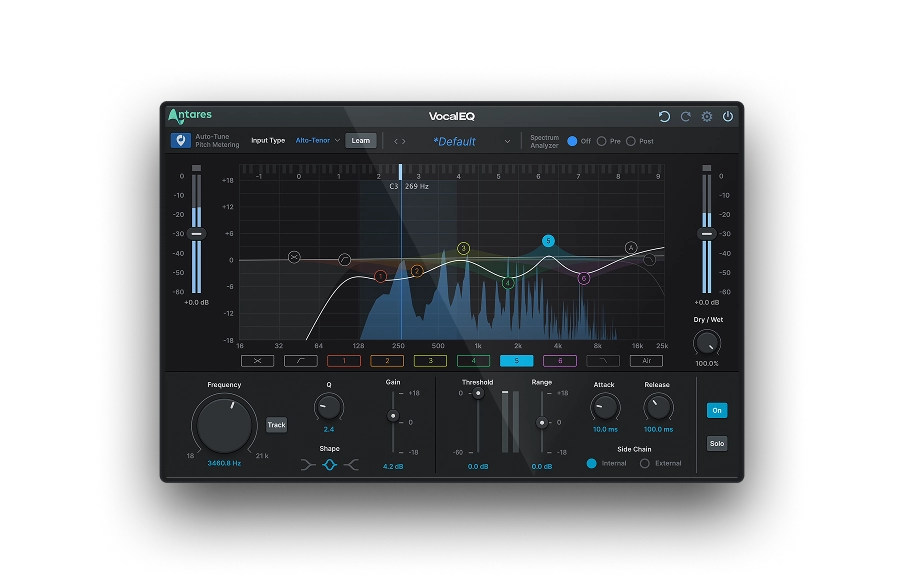
Vocal EQ
Clarity Above All
Remove Handling Noise
Handling noise is almost inevitable when recording conferences or live music. This type of background noise includes adjusting microphones, people walking on stage, moving chairs, and so on. In these situations, a high-pass filter will help you remove some of the low frequencies created by these unwanted sounds.
Improve Mix Clarity
Aside from removing noise and unnecessary frequencies, you can also use high-pass filters to improve the tone and make it more of a balanced mix. Let's say you have a bass guitar and a kick drum in the same frequency band – you can apply a high-pass filter on one instrument to make room for the other.
Set Speaker Crossover
High-pass filters are used in audio systems to separate high and low frequencies. If you send low frequencies to a high-frequency tweeter, you could damage your playback device. We recommend you use crossovers that use low-pass filters to send low frequency signals to the woofer and high pass filters to send high-frequency signals to the tweeter.
When to Avoid a High Pass Filter
Using a high-pass filter on bass heavy tracks will compromise the natural sound of the musical instruments. Don’t use this filter on kick drums or bass guitars, where low frequencies play a crucial role in the instrument’s audio spectrum.

What is a Sidechain High-Pass Filter?
You would want to use a high-pass filter on your sidechain to fine tune the impact of your compressor in the final audio.
By applying a high-pass filter to the sidechain signal, you’ll only let higher frequencies affect your mix, while the lower frequencies will be modulated according to the main audio signal. This can be useful for various effects, such as ducking the bass in a mix when the kick drum hits or creating rhythmic modulation effects.
The main difference between the standard high-pass filter and a sidechain high-pass filter is that the latter responds to certain frequencies and adjusts the compressor’s impact on the audio signal accordingly.
High-Pass Filter Settings
High-pass filters have two main controls: cut off frequency and slope.
The cut off frequency sets where the filter starts affecting the signal, and the slope determines the rate of the filter. The slope is measured in decibels per octave, allowing you to set a steep or gradual filter.
Imagine a high-pass filter with the cut off frequency set to 400 Hertz and a slope of 12 dB per octave. Let's say for 400 Hertz, the cut off frequency is 0 DB, meaning one octave below 200 Hertz would be 12 DB. Two octaves below the cut off 100 Hertz would be 24 DB, and so on.
High-Pass Filter Mixing Techniques
Here are a few techniques for using a high-pass filter in mixing:
Clean Up The Low End
One of the most common uses for a high-pass filter is to remove unwanted low frequencies from a mix. This can include sub bass frequencies outside the range of most speakers or low frequency noise like hums or rumbles. By using a high-pass filter to attenuate these frequencies, you can clean up the low end of your mix and make the audio clearer and more polished.
Create Room in the Mix
You can also use high-pass filters to create space in a mix by removing low frequency content from individual instruments. For example, if you have a kick drum and a bass guitar occupying similar frequencies, you can use a high-pass filter on the bass guitar to remove some of the lower frequencies and create more “space” between the two instruments.
Vocal EQ
Clarity Above All
Shape the Tone of an Instrument
For example, if you have a guitar that sounds too muddy, you can use a high-pass filter to remove some of the low frequency signals and make the guitar sound brighter and more defined. The same goes for vocals.
Create Rhythmic Effects
In some cases, high-pass filters can be used to create rhythmic effects. For example, you could use a high pass filter on a sidechain signal to create a "pumping" effect, where the bass frequencies are ducked every time the kick drum hits. In this way, you’ll energize your mix in an interesting and engaging way.
Automation
You can use this technique to create a "sidechain ducking" effect, which is a great way to bring dynamic and interesting soundscapes to life.
Here's how to use sidechain compression to duck the bass frequencies in a mix whenever the kick drum hits:
- Set up a sidechain compressor on the bass track, with the kick drum track as the sidechain input.
- Use the compressor to duck the bass whenever the kick drum hits, creating a pumping effect.
- Add a high pass filter to the sidechain signal, and adjust the cut off frequency so that only high frequency signals from the kick drum are passed through to the compressor.
- Use automation to gradually increase the high pass filter's cut off frequency throughout the mix. It will make the ducking effect more subtle and natural as the song progresses.

Exclusive AutoTune Content

Vocal EQ

AutoTune Unlimited
AutoTune 2026 and Metamorph
Now Included

Antares Editorial
Antares is a leading developer of software for music recording and live performance. For over 20 years, Antares has powered the music of top-charting and indie artists with products including the industry standard for pitch correction, AutoTune™.