A de-esser is a frequency-specific compressor that reduces sibilance in vocal recordings. Sibilance is the harsh, hissing energy that comes from "s," "sh" and "t" sounds, concentrated between 4 kHz and 10 kHz. Every voice produces it. Condenser microphones amplify it because they're sensitive in exactly that frequency range. Compression makes it worse because it brings the overall level up, and those sibilant peaks ride along with it. A de-esser catches those peaks and pulls them down without touching the rest of the vocal.
The trick is controlling sibilance without killing it. Remove too much and the vocal sounds lispy, like someone knocked the teeth out of every word. Remove too little and the "s" sounds cut through the mix like a razor blade through headphones. That balance is the entire job of a de-esser.
Why Sibilance Gets Worse in a Mix
Sibilance is rarely a problem in the raw recording, and it becomes one after processing. Compression raises the overall signal level, which raises the relative loudness of sibilant peaks. An EQ boost in the 5-8 kHz presence range, the exact move that makes a vocal cut through a dense mix, amplifies the same frequencies where sibilance lives. Sibilance is concentrated between 4 kHz and 10 kHz, though certain voices and microphone combinations can push it lower. Close-mic a vocalist on a bright condenser, compress the signal, add a presence boost, and the "s" sounds can go from natural to painful in three plugins.
This is why de-essing exists as a dedicated step in the chain. A broadband compressor can't solve it because it reacts to the full signal, pulling everything down when a sibilant peak triggers the threshold. A de-esser reacts only to the targeted frequency band, so the vocal stays at full level while only the sibilant range gets attenuated.
How to Find the Sibilance Frequency
The exact frequency where sibilance peaks varies by voice and by microphone, meaning a tenor on an AT2020 might peak at 6 kHz while a soprano on a Rode NT1 might peak at 8.5 kHz. This is why it’s important you find where the audio is peaking for the specific recording you're working on.
Solo the vocal, insert a parametric EQ with a narrow, high-Q boost of 6-8 dB. Sweep it slowly through the 4-10 kHz range while listening to a section with several "s" sounds. As a starting point, male vocalists typically center around 5-6 kHz and female vocalists around 7-8 kHz. The frequency where those sounds become most exaggerated and piercing is your target. Once you've found it, remove the EQ boost and point the de-esser at that exact frequency.
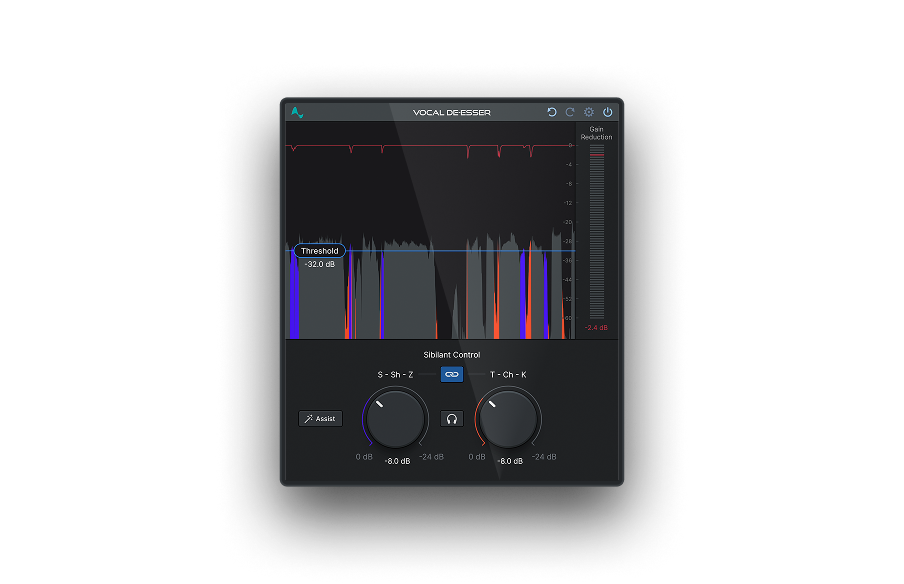
The Vocal De-Esser in the AI-Powered Vocal Chain skips this step entirely. Its Assist function analyzes the vocal and identifies the sibilance characteristics automatically, then sets the target frequency and threshold as a starting point. You can adjust from there, but the manual sweep becomes optional.
Setting the De-Esser
With the frequency identified, set the threshold so the de-esser triggers only on sibilant sounds, not on every consonant in the performance. Play back a section with several "s" and "sh" phrases and watch the gain reduction meter. It should activate clearly on sibilant sounds and stay quiet on everything else.
For reduction amount, 2-4 dB handles most vocals. That's enough to tame the harshness without introducing artifacts. Push past 4-5 dB and the "s" sounds start disappearing instead of sitting in balance with the rest of the vocal.
For attack and release, keep the attack fast since sibilant sounds are transients. They spike hard and decay quickly, so the de-esser needs to catch them the moment they cross the threshold. Release should be short enough to recover before the next consonant, typically 50-150 ms. Too slow a release and the de-esser stays active into the next syllable, dulling consonants that don't need processing.
The goal is for sibilance to match the level of the surrounding high-frequency content, not to vanish from the performance.
Manual De-Essing
Before reaching for a plugin, consider the clip-gain approach. Find the sibilant sounds in the waveform (they show up as dense, football-shaped clusters of energy), split them into their own regions, and pull the gain down 2-3 dB on each one. Crossfade into and out of the region so the edit is seamless. This is tedious on a full vocal. It also produces the most transparent results because you're treating each sibilant sound individually instead of applying a blanket rule across the entire performance. On vocals where only a handful of "s" sounds are problematic, manual de-essing is faster and cleaner than configuring a plugin.
Broadband vs. Split-Band
Broadband De-Essing
A broadband de-esser reduces the gain of the entire signal when sibilance crosses the threshold. The whole vocal dips briefly on every "s" sound. This creates a subtle pumping quality that's audible on exposed vocals.
Split-Band De-Essing
A split-band de-esser reduces gain only in the targeted frequency range. The rest of the signal stays at full level. This is more transparent and the standard approach for professional vocal mixing. The Vocal De-Esser in the AI-Powered Vocal Chain uses split-band processing, targeting the specific sibilance range without affecting the vocal's body or presence.
De-Esser vs. Dynamic EQ
A dynamic EQ achieves the same core result as a de-esser (frequency-specific gain reduction triggered by a threshold) with significantly more control over the details. A dynamic EQ lets you set the exact Q width, choose between bell and shelf shapes, and stack multiple bands across different frequency targets. A dedicated de-esser is faster to set up because it's built for one job and makes fewer decisions necessary. If you need surgical precision on a vocal with sibilance peaks at multiple frequencies, reach for a dynamic EQ. If you need to tame a standard sibilance problem in 30 seconds and move on, a de-esser gets you there with less fuss.
De-Essing Beyond Vocals
De-essers work on any source with harsh high-frequency content. Cymbal bleed in overhead mics, hi-hats that cut through a mix too aggressively, and guitar amp simulators that reveal their digital origins in the upper midrange all respond well to targeted de-essing around 3-5 kHz. On the mix bus, a gentle de-esser can soften an overall mix that's too bright without the static cut of an EQ pulling life out of the entire top end.
Where the De-Esser Goes in the Chain
The standard placement for a De-Esser is usually after an EQ and after compression. That order matters because compression amplifies sibilant peaks and makes them more consistent in level, which gives the de-esser a more predictable signal to work against. De-essing before compression means the compressor may re-amplify the sibilance you just reduced. De-essing after gives you the final word.
In the full AI-Powered Vocal Chain, the signal path is Vocal Prep for noise cleanup, AutoTune 2026 for pitch correction, Vocal EQ for tone shaping, Vocal Compressor for dynamics, Vocal De-Esser for sibilance, and then Vocal Reverb for space. The de-esser sits second to last because it catches sibilance in its final, fully processed state before the signal hits reverb. Sibilant "s" sounds feeding into a bright reverb create a washy, harsh tail that's much harder to fix after the fact.
De-essing the send to your reverb bus separately is another move worth knowing. If the main vocal sounds fine but the reverb is picking up too much sibilance, insert a de-esser on the send channel before the reverb plugin. The dry vocal keeps its natural consonants. The reverb only receives the de-essed signal. Clean tails, no compromise on the dry sound.
Vocal De-Esser
AI-Powered Sibilance Control
Frequently Asked Questions
What is a de-esser and what does it do?
A de-esser is a frequency-specific compressor that reduces the level of sibilant sounds ("s," "sh," "t") in a vocal recording. It targets a narrow frequency band, typically between 4 kHz and 10 kHz, and applies gain reduction only when the signal in that band crosses a threshold.
Where should the de-esser go in my signal chain?
After EQ and after compression. Compression amplifies sibilant peaks, so de-essing after compression addresses the sibilance in its final amplified state. Placing it before compression risks the compressor re-amplifying the sibilance you already tamed.
How much de-essing is too much?
If the vocal sounds lispy or the "s" sounds feel suppressed instead of controlled, you've gone too far. Aim for 2-4 dB of gain reduction on sibilant peaks. The vocal should still have natural consonant clarity without the harshness.
Why are my vocals so sibilant?
Close mic placement with a condenser microphone, compression that raises the relative level of sibilant peaks, and EQ boosts in the 4-10 kHz range all amplify sibilance. Some voices are naturally more sibilant than others. A dynamic microphone in the same position will capture less sibilance at the source.
Does pitch correction affect sibilance?
AutoTune 2026 processes fundamental pitch and doesn't directly interact with the sibilance range. In a complete vocal chain, pitch correction happens before de-essing. The two processes operate independently on different parts of the frequency spectrum.

Exclusive AutoTune Content
Vocal De-Esser

AutoTune Unlimited

AutoTune 2026 and Metamorph
Now Included

Antares Editorial
Antares is a leading developer of software for music recording and live performance. For over 20 years, Antares has powered the music of top-charting and indie artists with products including the industry standard for pitch correction, AutoTune™.