
There's no room for imperfection in music production these days. Every song element must blend seamlessly together and create a captivating vibe that sounds pristine on all streaming platforms and playback devices.
This is particularly true when we record and mix vocal tracks. Usually, we want the singer's voice to stand out and sound unique, consistent, and enhance the track's energy while blending perfectly with the rest of the song’s elements.
This is no trivial task, but today, we’re going to share some specific techniques that work well on all genres and styles, and will make your vocal tracks sound smoother and more professional.
Preparing for Recording
Instead of relying on post-production to fix audio flaws, focus on recording good vocals from the start.
The first element you need to consider is the acoustics of the room you’re recording in:
- Do your best to remove elements that might cause audio feedback, unwanted reverb, and vibrations.
- Use soft furnishings to reduce echo and absorb unwanted sound frequencies.
- Remove any items hanging on the walls, such as pictures that may vibrate from movements or loud noises.
Next comes the microphone. In our opinion, it's always best to choose a versatile, intuitive, and "forgiving" mic that'll satisfy your needs and simplify your workflow. Many producers use dynamic microphones such as the Shure SM7B or Shure SM57. Condenser microphones like the Rode NT1 or the Neumann U87 are popular among home producers and podcasters.
Consider investing in high quality mic preamps or an audio interface that includes mic preamps. If your mic preamp lacks power, your microphone won't express its full potential, no matter how much you invest in it.
For singers, the voice is their most valuable tool. The art of a producer's role is to ensure singers are at their best before they start recording. One way to do this is to encourage them to practice some warm-up exercises before and in between sessions.
Professional singers practice vocal exercises every day, generally consisting of mouth, lip, and tongue exercises, and breathing techniques that relax the body and facial muscles to release tension. The goal of practicing vocal exercises is to gain better breathing control, and improve vocal dexterity and pitch accuracy. Consider practicing the following basic exercises: lip rolls, humming or singing scales, and diaphragm breathing.
Before starting your recording, make sure to eliminate all distractions. Turn off your notifications, eliminate any external or internal noises that may interfere, and let those around you know not to disturb you while recording. This includes informing your flatmates or parents not to use vacuum cleaners or run noisy appliances such as a dishwasher.


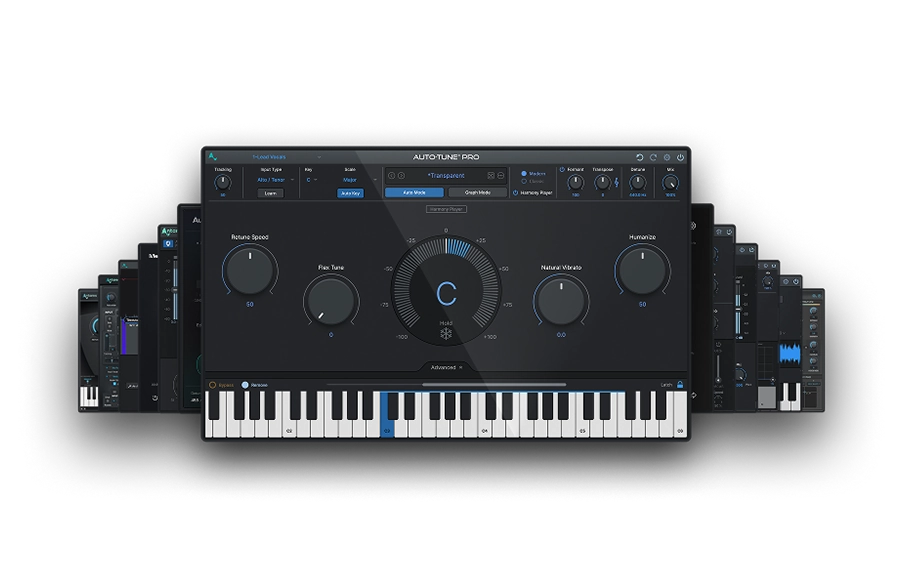
AutoTune Unlimited
The Ultimate Vocal Production Suite
Recording Techniques
Following the previous guidelines, you should be ready for a successful recording session. To ensure optimal results for your vocal tracks, consider the following tips.
Breathing
Improve your breathing by practicing filling your lungs completely and using your diaphragm. Relax your diaphragm using different breathing techniques and practice exercises that make it stronger, provide more control, and support optimal vocal range. A vocal coach can help a singer learn how to breathe correctly.
Taking deep breaths with the 4-7-8 breathing technique can help reinforce your diaphragm, lungs, and larynx. Inhale for four seconds, hold it for seven, and exhale for eight seconds. There are a variety of deep breathing techniques that you can try out, like quick breaths, gasping, and panting.
Mic Placement
The placement of your microphone will greatly impact the sound of your vocals. There is no one-size-fits-all solution, as the microphone should be positioned based on the singer's tone and articulation. Finding the best placement may require some experimentation.
The most common position for a microphone is directly in front of the singer, close to their mouth. This placement takes advantage of the proximity effect to produce warmer vocals, but it can also pick up unwanted noises from the mouth and lips. To mitigate this, you can use a pop filter.
Try different mic placements, such as pointing the microphone upwards or downwards towards the chest. These placements may reduce plosives and sibilance in the vocals.
Microphone Modelers
If you're using a budget microphone but still want to achieve professional results, you can use our Mic Mod plug-in to emulate the sound of your dream microphone.
Mic Mod by Antares allows you to choose from a library of over 100 vintage microphones— including models from Neumann, Telefunken, and AKG—to add classic vintage warmth and saturation to your vocal recordings. Adjust your mic's characteristics to bring a rich, unique sound to life!

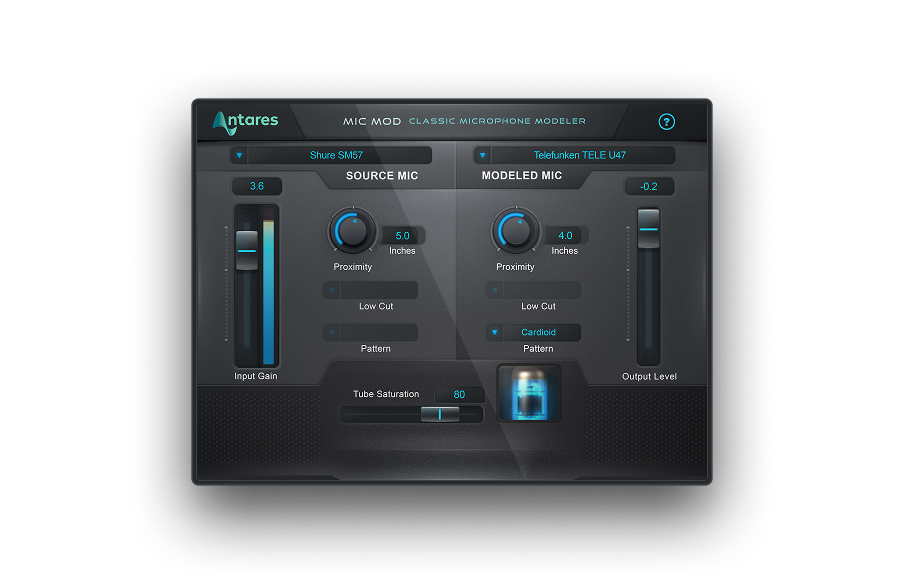
Mic Mod
Classic Microphone Modeler
Other Techniques
Overdubbing, also known as layering, is a technique that involves combining multiple vocal takes during the mixing process to add depth and dimension to your vocals. This can also help correct any imperfections you may discover upon reviewing your recordings.
Consider incorporating effects to add diversity to your vocals. Use effects like delay, equalization (EQ), or reverb to create a sense of progression, smooth out the vocals, and enhance the spatial qualities of the song.

Post-Production Techniques
The post-production process consists of two key stages: mixing and mastering. Mixing is the first step which involves ensuring that all tracks and instruments are arranged cohesively, and that the song sounds harmonious.
Mastering is the final step in post-production, and provides one last opportunity to make changes to the song. This includes adding equalization (EQ), compression, and limiters to ensure the loudness and dynamics are appropriate before release.
It's important to be mindful of common mistakes during mixing and mastering, such as over-processing, creating unintended distortion, applying too much EQ, and failing to treat mixing and mastering as distinct steps in the post-production process.
How to Enhance Vocal Smoothness
During the mixing phase, you can use several tools to enhance the smoothness of your vocals.
EQ can help you magnify or mitigate certain frequencies. Use EQ to boost higher frequencies and improve vocal clarity. Before you apply an EQ, ensure that your vocal tracks have no evident flaws like plosives or sibilance.
If you're looking for a versatile mix of compression and high-pass filters to refine your vocal performance, try Vocal De-Esser. This professional de-esser gives extreme control over sibilance while leaving the natural properties of your vocal recordings untouched.
You can also improve the smoothness of your vocal with other effects like saturation. Distortion effects can add mesmerizing harmonics to your recordings, to make your vocal tracks sound rich and warm. Spatial effects like reverb, panning, and layering add depth to your vocals and give them a sense of space and dimension. By placing each instrument in the right place within the stereo image, you can craft your own unique sonic image
Be careful to avoid exaggerating vocal effects, as you might end up burying your vocals or making the volume uneven throughout the song.
If your tracks' volume changes drastically, use volume automation to detect volume drops and adjust the level accordingly. Then add compression to improve the consistency of the audio levels on the vocal track. Compression works by lowering high peaks and raising the level when it drops too low (without making it clip).
AutoTune Unlimited
The Ultimate Vocal Production Suite
Advanced Techniques
When mixing with advanced techniques you can shape your vocals to match exactly as you have envision them.
With the legendary Auto-Tune pitch correction tool, you can fine-tune your tracks and adjust the pitch in real time. This effect opens up endless opportunities to expand your sonic palette with effects that can upgrade your music's creativity and sound quality.
Or, add texture and life to your vocal with the Harmony Engine plug-in, which allows you to easily develop catchy harmonies from a single monophonic track, create them from scratch with your MIDI controller, or choose the chords of preference.
Also try Auto-Tune Vocal Compressor, our dual-stage vocal compressor with machine-learning technology, to get the right sound. The plug-in analyzes your vocal track and applies the optimal amount of compression automatically. It features four popular compression styles: FET, Opto A, Opto B, and Modern, and contains a built-in Warm feature to apply vintage tube saturation and harmonics to your vocal tracks. This may be one of the most simple 'advanced techniques' you'll employ!

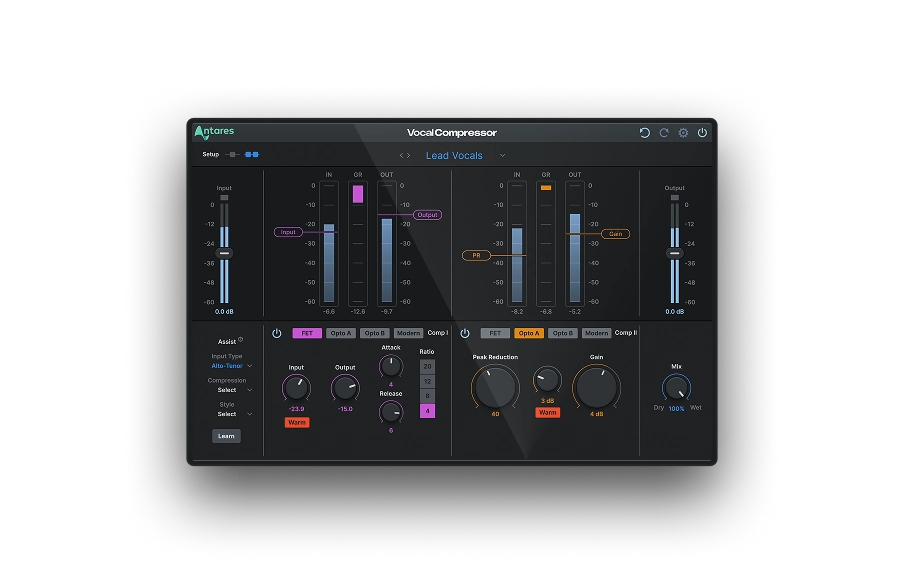
Vocal Compressor
Dual-Stage
AI-Powered Vocal Compression
Final Thoughts
Bringing unforgettable, high-quality vocals to life can be a daunting task if you need more experience or the right tools. However, once you hone your recording and post-production skills, you can refine vocal recordings and create a unique sound signature. Keep experimenting with recording techniques and post-production effects until you achieve the sound you've always dreamed of!

Exclusive AutoTune Content


AutoTune Unlimited

AutoTune 2026 and Metamorph
Now Included

Antares Editorial
Antares is a leading developer of software for music recording and live performance. For over 20 years, Antares has powered the music of top-charting and indie artists with products including the industry standard for pitch correction, AutoTune™.